In an alphanumeric field the sort order is blanks, then numbers and finally letters except when special characters (commas, underscore etc) are involved when they could sort either ahead of, or after, alphabetic or numeric characters. Upper and lower case can also affect the order. The fact that you are seeing a number does not necessarily mean the field is numeric it may be alphanumeric. As a consequence, if you don't get displays or reports in the order expected, check what you are sorting on and watch out for unintentional leading blanks on alphabetic or alphanumeric fields and special characters.
If the field is numeric, sorting on it will arrange the records in ascending numeric sequence, i.e. 1, 135, 1000 but remember the Code field is an alphanumeric field and could contain letters and special characters which may also give unexpected results.
Report Sequence and Report Range
The Report Sequence and the Report Range options are used in combination with each other.
The Report Sequence radio button determines the display order of the output records.
The Report Range From and To boxes allow partial selection of the records available in the report sequence selected.
Notes
Choosing Alphanumeric most often will use the SortKey and choosing Code will use the (usually) system generated number assigned to master records. In fact both of those fields are alphanumeric and the system generated content can be overridden with "any" characters you wish to enter.
Selecting alphanumeric with numbers in the range boxes will generally produce nothing. Similarly selecting code and entering alphabetic letters will generally also produce nothing.
The simplest way to print a report for a single main screen entity such as a landlord is to select the entity first, choose the report, next choose Code and Range which will automatically insert the code from the selected main screen record in both the Range From and To boxes. If you select Alphanumeric and Range you will get multiple main screen records if the same SortKey is used more than once.
Period Selection
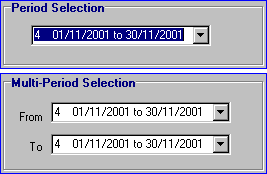
Selecting a period or period range restricts the report to transactions within that period or periods. The period or period range is selected from one or a pair of list boxes which display the available periods.
Note Throughout the system you will often find two dates in a list box. The first date indicates the earliest date associated with the item(s) being displayed and the second date the latest date. In any period selection list box the first date will be the opening date of the period and the second date the last date of the period. Typically these will be the first and last dates of the calendar month. In other situations both dates may be the same indicating every item has the same date.
Portfolio Selection
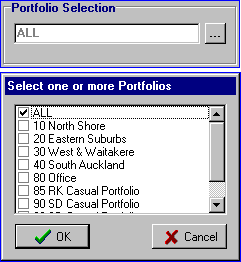
Selecting a portfolio restricts the report to transactions within the portfolio(s) selected. Any number of portfolios may be selected at one time by clicking the "three dots" button then ticking the desired check boxes. Some reports allow each portfolio to start on a new page.
Property Manager Selection
The main screens are capable of displaying only master records for which a property manager is responsible and many reports have the same facility. Where a property manager is responsible for multiple portfolios by selecting a property manager the system automatically selects all their portfolios in one hit. However, further selection by portfolio (where available) can be made to limit the report to just some of the property manager's portfolios.
Be Aware When selection is done by property manager it is possible for data to appear unexpectedly from landlords or tenants who do not belong to the selected property manager. This is caused when a landlord has multiple properties which are assigned to different portfolios which themselves have different property managers assigned. The result is property manger A has property manager B's records included on property manager A's reports and v.v. because they both "report" to the same landlord albeit for different properties. If you think about it for a moment , if you are talking to a landlord about their statement you need to see all the transactions not just the ones applicable to you. The message here really is to avoid the situation where two property managers are responsible for the same landlord's properties wherever possible.
Report Destination
Once the selection is complete pressing Start will display the Report Destination screen
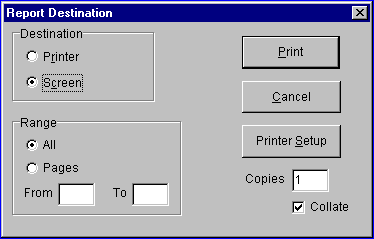
Printer Setup will display the standard Windows setup page for the printers available on your system. Choose the printer you wish to use and set any other printer parameters required. You should only need to use this occasionally as the settings are remembered for the next report.
Collate only applies when printing multiple copies. For example with Collate ticked printing multiple copies of landlord statements prints them in this order Bloggs, Lorimer, Zambuka, Bloggs, Lorimer, Zambuka. When Collate is unticked they print Bloggs, Bloggs, Lorimer, Lorimer, Zambuka, Zambuka. In general unticked, which is the default, is best because one bundle gets posted and the other bundle filed. It is easier than folding and stuffing one document to post and then having to file its mate.
If you have a photocopier with a document feeder it is usually quicker and cheaper to use it for your second copies, particularly when using expensive letterhead.
Most organisations can save a great deal of time and money by emailing the bulk of the information sent from the system and in particular the landlord statements which will probably be 90% or more of the outward "mail".
Emailing Reports
When a report is produced you may wish to email it to someone. This can be done simply by pressing [Email Report] on the print preview (Ace Viewer) screen, as outlined in the steps below. Understand the report is every page contained in the print preview, not just the one you can see.
So, when you press [Email Report] you are emailing the entire report to a single recipient.
Let's just repeat that - the entire report will be emailed to a single recipient.
As an example, if you print (all) the landlord statements and press [Email Report] and work through the next series of screens, which surely indicate you are sending to one email address, and then press [Send] on the last screen there is only one person who will receive the statements for all your landlords.
I've told you a lie really when I said there is only one recipient, because, as with other emails throughout the Aspect Property Manager, you can CC emails to other email addresses which in this case may be added on the Email to screen along with any other attachments you may wish to send. Several previously produced reports, or a newsletter, could have been saved to the disk and added to the final report as attachments. They also would receive the entire report.
1. When emailing a report to a landlord, tenant or supplier, selecting that recipient before running the report is an advantage, but not essential.
2. Run the report and print it to the screen
3. Press [Email Report]
4. Select the recipient using the radio buttons and the list boxes
The landlord, tenant or supplier address offered will be the currently selected entity on the respective main screen
5. Or select Other and enter the email address
6. Press [OK]
7. On the Email to screen enter the email subject, any message required, add any EmailCC addresses and any further attachments.
8. Press [Send]