Web Page Creation
First.....Prev.....Next.....Last
XXXX Similar process for TradeMe
The Aspect Property Manager provides several methods of easily displaying properties to rent on the Internet. Details may be transferred to your own web site, uploaded to TradeMe, or uploaded to RealENZ if you are a RealENZ member. Other web sites may be added as demand dictates.
XXXX
The one discussed in this topic is designed for users with their own web site. The second method available to RealENZ members is covered in the Web Page - RealENZ - Create Upload File topic. If you use the latter, RealENZ requires the use of specific suburb names (subdivisions) and a matching program is used to convert any "non-standard" suburb names to the RealENZ standard names. Anyone may use this matching process just to standardise the suburb names.
In overview, the Aspect Property Manager allows you to generate web page details for selected properties. The details are then integrated on your computer with the web page designed by your web page designer and may be viewed prior to transferring them to your web site. The resulting "finished" web pages and photos are then transferred to your web site server.
There is a sample web page layout included in the Aspect Property Manager to give you an indication of the type of web page content available. These pages can be used directly but you may find their appearance not to your liking and want to design your own. You will at the very least require your web designer to provide a link to these pages if you wish to use them.
The entire process essentially requires two steps, the first is to select just those vacant properties you want on the web and create the file(s) containing the details required, the second step is the actual transfer of the file(s) to your web site.
Selection
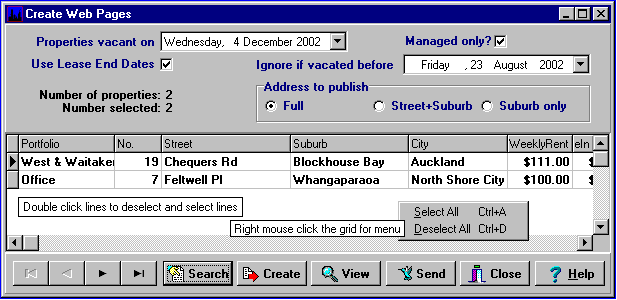
To select the vacant properties first run the Admin menu > Create Web Pages program which will produce the following screen with vacant properties which meet the selection criteria displayed in the grid.
Location... Admin menu > Create Web Pages.
The initial display shows all properties which are, or will be, vacant on the "Properties vacant on" date. Change the date as required to include properties becoming vacant in the future. If the "Use Lease End Dates" box is checked properties with tenants whose lease (or fixed term tenancy) runs out on or before that date will be included. Properties which were vacated on or prior to the "Ignore if vacated before" date will not be displayed. These two dates provide a time window of properties to be considered for re-tenanting. After making any selection change click the "Search" button to refresh the details displayed.
Each line in the grid shows the details being transferred to your web site.
Deselect those properties which you do not want to transfer by double clicking the line to make it non-bold text. When you are happy with your selection click the Create button to create the actual web site files ready for transfer.
If you have photos of the property in the Aspect Property Manager, up to XXXX ten photos attached to each property will be transferred to the web site. Only photographs with the suffix 0 to 9 will be transferred, see the Properties Details > Photo Gallery XXXX 4000 ???? topic. Your web page designer will generally require the photo to meet specific requirements and it may be necessary for existing photos to be edited for size and possible to get them on the web page in the order desired.
Viewing
Click the view button to see what your web site display will look like. If you find "missing bits" fix the problem and repeat this procedure. If there are properties which shouldn't be listed deselect them, click Create and view the "web site" again. When you are satisfied with the result click the Send button.
Transfer
The transfer of the file is carried out using a common utility called FTP, (File Transfer Protocol), which places the file you created by pressing the "Create" button into a specific location on your ISP's web site server. It is possible that there may be no restrictions on when you may transfer your new listings to your web site so they may appear almost immediately.
When the Send button is pressed the following "send" screen will appear.
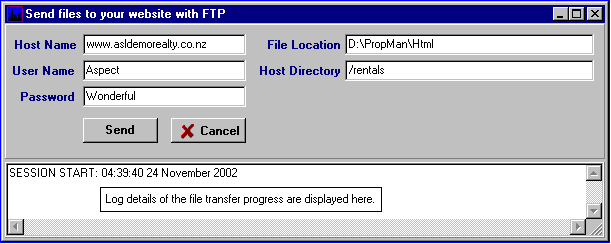
The first time you transfer the files to your web site you will need to complete the fields shown in the header. Subsequent sends will remember and display your previous entries.
Host Name
This will normally be your web site address.
User Name
The FTP login name supplied by your ISP/web site designer. This will usually be case sensitive.
Password
The FTP password supplied by your ISP/web site designer. This will usually be case sensitive.
File Location
This directory contains the web details to be transferred and by default will be ...\PropMan\Html unless you have located the directory elsewhere.
Host Directory
The destination location for the file(s) being transferred supplied by your ISP/web site designer. This will usually be case sensitive.
Assuming these details are complete click the Send button. The connection MUST be established prior to clicking Send. If you are not connected, or the above entries are incorrect, an error message will be displayed and the Aspect Property Manager will terminate.
As the file transfer proceeds the events are logged on the screen and also in the database to be used for analysis if problems are experienced. If the transfer is successful you will get a "Send completed successfully" message. If the transfer is not successful you will get a "Send unsuccessful" message the cause of which will be external to the Aspect Property Manager such as line errors or other external problems.
Where you have a firewall in place you will need to ensure that the Aspect Property Manager has access to the Internet allowed.
Web Site Design
When having your web site pages created please ensure your designer understands that web page templates reside on your system with parameters embedded in the code which are then replaced when the "Create" button is pressed. The templates are used to build the actual web pages on your computer so they can be viewed "in house" first before they are transferred to the web server.
Our very simple templates can be viewed by your designer in the ...\PropMan\Html directory as ModelIndex.htm, ModelIndexNoAddress.htm, ModelPhotos and ModelProperty.
If you wish to use these web pages but would like to change the background or replace the No Photos Available replace the "background.gif" and/or "nophotos.gif" with you own "gif" image files in the ...\PropMan\Html\WebPages\Images directory. The replacements must be "gif" images with the existing names.
Please contact Aspect Systems support, or have your web page designer do so for further details, or if you would like us to arrange for the web pages created to meet your requirements.