BackUp and Restore
First.....Prev.....Next.....Last
Back-ups are like insurance. Some people have it others don't. Some people do back-ups, others don't. Only you can judge the importance of your company's computer based data and programs and what would happen if you lost it all. Consider whether you could stay in business if all your current manual records were irretrievably lost through fire or other misadventure.
Computers and their records are the same as manual records. They are not "bomb proof" regardless of what you may have been told previously. Your computer itself could be damaged by fire, flood, vandalism, accident or even stolen. Your data could be lost through any of the preceding events, operational failure, by incorrect operation or a virus attack.
If you think that you can handle these events then back-ups are not for you. However, for most mere mortals they are essential. Back-ups are not something only BIG companies need to do. They are for everyone, regardless of size.
This topic discusses back-ups in a general way but the Aspect Property Manager has an integrated BackUp and Restore program facility for backing up and restoring. It is a simple and easy to use procedure which does not require detailed computer knowledge required by most backup systems. You can, however, choose to backup just certain sections of the database through to the entire PropMan directory. It will perform the entire backup procedure for you with as few as three mouse clicks. The Restore procedure places all the backed up files back in their original locations. Selective restoring is not possible. If you have not read through this topic previously I recommend you continue reading so you get an understanding of the philosophy behind back ups. If you know it all and only want help on the integrated BackUp and Restore program click here.
Taking back-ups involves a trade off between the time it takes to do the back-up and the time and effort involved in reentering all the data and transactions if you have a failure. A back-up takes the data you have selected to save, from your hard disk, and compresses it to a considerably smaller size and places it on some off-machine media. There are many different back-up strategies and outlined below is one that is effective and easy to control.
It is absolutely USELESS backing up your system on to the same set of media each time you back-up.
This topic does not cover the specifics of carrying out a back-up nor the equipment and media to use simply because there are "dozens" of software and hardware options available including our own integrated BackUp and Restore. Discuss what is best for you, with one of your software suppliers first, then go shopping. Take into consideration the capacity of your disk, the volume of data and other files you want to back-up and the back-up media capacity and speed.
I want to put in a very strong plug here for using CDs or DVDs because they have a high capacity (typically 650Mb or 5-7 Gb respectively), are inexpensive (around $1.50 per CD and $5 for DVDs) and are probably faster than any comparable device. Virtually all new computers include a CD/DVD writer these days. If you adopt the five CD approach which follows most users will take around two years to fill a CD. Larger organisations will obviously take less time and DVDs may be a better answer. In money terms for around $10 you can buy two years worth of insurance minimum. If re-writable CD/DVDs are used it is a life-time of insurance.
Media Requirements and labelling
You require nine sets of back-up media. A set may consist of one or more diskettes, CDRoms, tape data cartridges or other less common media. Each set must be capable of holding all the files you wish to back up. For example if you are backing up 3Mb of data, each set will require three 1.2Mb floppy disks. A system with 100Mb will need media that can contain that amount of data.
First label each set of back-up media as follows :-
Set 1 - Monday
Set 2 - Tuesday
Set 3 - Wednesday
Set 4 - Thursday
Set 5 - Friday 1
Set 6 - Friday 2
Set 7 - Friday 3
Set 8 - Friday 4
Set 9 - Friday 5
If you need multiple volumes in each set label them Monday A, Monday B, Monday C, and so on, NOT Monday 1, Monday 2, Monday 3 ... See diagram below

How to make it work
Assuming you start backing your system up on the first Monday in the month :-
On Monday......... back-up to the set labelled Monday
On Tuesday........ back-up to the set labelled Tuesday
On Wednesday... back-up to the set labelled Wednesday
On Thursday....... back-up to the set labelled Thursday
On Friday........... back-up to the set labelled Friday 1
You now have five sets containing copies of your data as at the point of back-up for each of the preceding five days.
On the second and subsequent weeks you will reuse sets Monday to Thursday overwriting the data previously recorded. So in week two you will :-
On Monday......... back up to the set labelled Monday.
On Tuesday........ back up to the set labelled Tuesday
On Wednesday... back up to the set labelled Wednesday
On Thursday....... back up to the set labelled Thursday
BUT
On Friday........... back up to the set labelled Friday 2.
This leaves the set labelled Friday 1 intact containing the data as it was on the first Friday of the month.
You now have daily back-ups for each of the preceding six days, i.e. this Friday (set Friday 2), Thursday back to Monday, and last Friday (set Friday 1).
Continue the same pattern for each of the following weeks using a different Friday set for the Friday back-up. Some months only have four Fridays and in those months the set labelled Friday 5 does not get used.
When the month changes and the first Friday in the month arrives reuse the set labelled Friday 1. Similarly with the second, (when the Friday 2 set is reused), and subsequent Fridays in the month.
Notes on Backing up
This method does not work with incremental back-ups. It is intended to back-up entire files or file systems so that recovery is a single operation rather than loading a "Master Back-up" followed by a series of daily incremental changes.
Some people like to retain the back-up made on the last Friday of the month or just before or after the end of month processing has been done. There is nothing wrong with doing so. It simply takes additional sets of back-up media.
It is also advisable to take a back-up prior to the end of period "roll-over". This checkpoint provides an escape route should you discover a need to get back to before the end of period. This back-up may be to a "normal" set or may use an additional back-up set which can be used for this purpose each month.
When a public holiday interrupts the sequence merely miss out that set. That is to say if Anzac day fell on Wednesday the sets used to back-up that week would be Monday, Tuesday, Thursday, and Friday 3 (or 4).
When a public holiday falls on a Friday you should use the Friday "x" set to back-up on the last day of the week instead of the Thursday set and make a note in your log book.
Keep a logbook in which you enter the date, time, back-up set used, and any significant event that may help you as a memory jogger if recovery is ever necessary, e.g. paid out creditors, ran payroll, used Friday 3 set on the Thursday before Good Friday and why .... and so on.
How often and what should be backed up is arguable, but we believe you must back-up your "operating data" daily. Your entire system, including all your programs and other "bits and pieces" should be backed up periodically using separate back-up sets not included in this procedure.
Media does deteriorate with usage and may make your back-ups useless. Periodically test that your back-ups are working by restoring your files from the back-up media. Before doing so make sure you can recover if the back-ups are no good and the recovery process destroys your good files. You can do this by renaming or saving the live files elsewhere on the hard disk or recovering your files on to another system.
Try and establish a mutual arrangement with another computer owner to provide emergency processing facilities should your computer be out of use for a few days and to see that each others back-up and recovery systems work.
You may wish to devise your own back-up procedure but remember that you must do it regularly and you should periodically test that what you are doing works.
If you get any messages appearing on the screen - read them. They may be simple instructional messages or error messages telling you something is wrong. If you get error messages at any time, but especially when backing up, don't ignore them. They occur because something is wrong. Find out what and fix it. If you don't know what the message means get assistance from someone who does.
Clean your back-up hardware regularly using good quality cleaning tools. Tape drives cleaning kits should clean both the read/write head and the capstan. Some only clean the read/write head.
Back-ups are not just for major disasters. They provide a checkpoint to which you may return if you find you "missed" something and want to start again from a known point.
Try and synchronise the printing of any Audit Trails with your back-ups it makes life easier when you do have to restore. You may have noticed I emphasised when and I can assure you it comes to all of us sooner or later.
Finally DO NOT keep your back-ups on site unless they are in a secure, fire and waterproof enclosure, preferable physically away from the computer. It's not much use leaving them with the machine and having your back-ups stolen or destroyed along with your computer.
Restoring from Back-up
The other side of backing up is the restore process. This takes the files saved on your back-up media and puts them back on to your hard disk. Most restore processes allow you to select all or just some of the files to be restored. The following discussion assumes you are restoring all the files on the back-up media.
Because the restore process s or over-writes the existing files on the hard disk it is essential to save what you already have before you start the restore because if the backed up data can not be recovered you will then have lost everything. If you can, print any audit trails and other relevant reports before saving. Then save what you have by renaming or moving the directories or files elsewhere on the hard disk. Taking yet another back up may be of little use if the back-up device and/or media are faulty but do so if that's all you can do. Clean the back-up device before doing the back-up.
After saving what you have, commence the restore process. In general the restore will default to not over-write the existing hard disk files unless you say to do so, because the files on the hard disk are younger than those on the back-up media. This is simply a "safety valve" to avoid unintentionally over-writing files. There will be an option to over-write all files regardless of date and this will be the option you will normally choose.
When the restore process completes look for error messages. If there are any error messages find out what they are all about and do not proceed until you have a restore which contains no errors, or at least none that matter.
Often restores do not work because the back-up device has not been cleaned on a regular basis. If you do have errors the first thing to do is clean the device and then try again. If the restore still fails try the back-up before the failing one. You may have to keep working backwards until you find one that restores properly.
Once you have a good restore reenter all the data etc since the "good" back-up was made. Make use of Audit Trail and other reports to work out what needs to be re-entered. Now perhaps you see the point of printing the Audit Trail at the same point as doing the back-up.
When all the data has been re-entered check the results are what you expected.
Finally, once you have lost all your data for whatever reason you will come to realise the value of doing back-ups and keeping your back-up device cleaned.
What to Back-up
This topic deals solely with back-up alternatives in so far as the Aspect Property Manager is concerned. The comments are my view on things and you are welcome to disagree. Also as noted earlier there are "dozen" of different back-up options so I will just work through the "standard" Microsoft back-up, (of which there are numerous variants), to a diskette. This program is usually found on the Accessories menu or the System Tools sub-menu.
If you wish to use the integrated BackUp and Restore, which will only back up and restore Aspect Property Manager files click here. If you would like gain further insights into backing up your other applications read on.
Because the capacity of a diskette is limited I would only back-up the actual database which consists of all the files in the ...\PropMan\Data directory.
Using Zip disks or tape drives I would, for most installations, back-up the ...\PropMan directory which would automatically include the Data directory. Even with this type of back-up device, if your database is large you may prefer to only take the Data directory to save time. These devices usually have their own back-up software package and you will need to adapt the following to suit.
Once you have set up a "daily" back-up job the same job should be used every day but you will use the appropriate set of diskettes from the Monday to Friday back-up sets as covered above.
You must first set up a "back-up job" in which you designate the files on the hard disk you want to copy to the diskette and then save it for future repeat use. The next topic takes you through that job setup procedure which will require adjustment to meet your particular back-up program.
In the topic following that we will go through a Restore.
In general you should never perform a back up or restore while the database is in use by any other user. It could be worthless. Many back up programs will not copy files which are in use. In addition the files in the database could contain incorrect information if someone changes some data after the file had been copied to the back-up media but before the back-up process had completed. Similarly, the restore process will not replace files which are in use so only some files may be re-written to the disk and you have a mess.
Qualification There are back-up systems which do allow you to back-up and restore working files but they are not the variety most users of Windows systems will ever see or wish to pay for. BUT the Aspect Property Manager internal backup and restore does allow backing up while other users are using the system. The Restore needs all other users to be logged off.
Back up Procedure
As stated previously there many variants of the "standard Windows" back up so what you see in the images I have reproduced below may not match your system but the general philosophy is the same. Some intermediary windows will also appear which I have not reproduced.
I have also included an alternative back-up method for those who have Windows ME which does not include any back-up software or those who have smaller databases, a Zip drive and don't wish to bear the cost of 10 Zip disks. Go here for that method.
Having closed all users out of the Aspect Property Manager and started the Microsoft Back up :-
Setting up the Back-up Job First Time
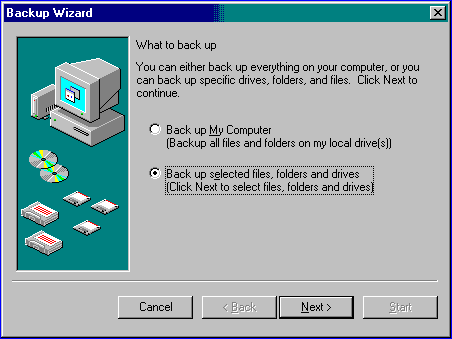
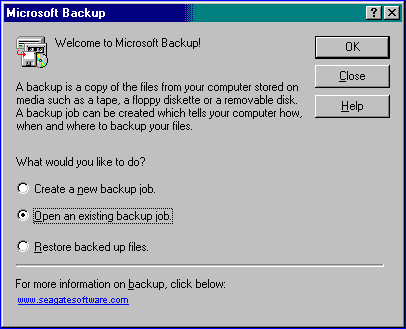
When you start the back-up you will see an image like this. Select Create a new job then click [OK].

Now choose "Back-up selected files ..." and click Next
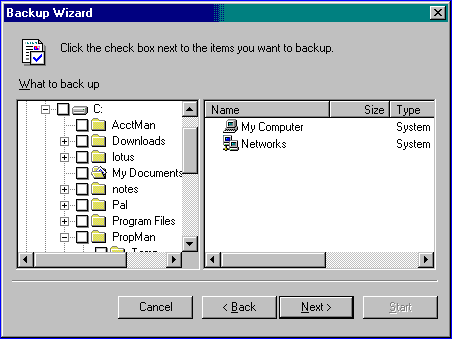
This next window shows the layout of the directories and files on your system.
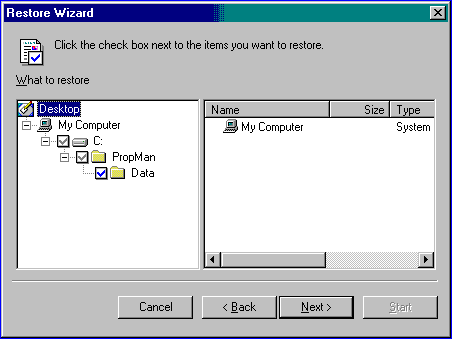
We are now going to select just the ...\PropMan\Data directory
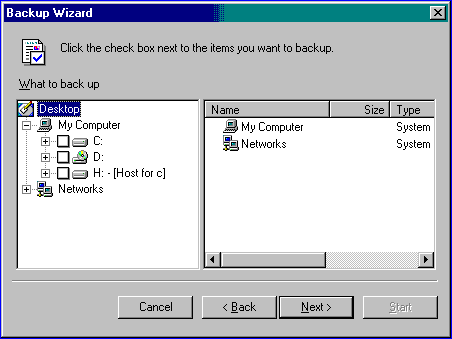
Click the + next to the C drive which will expand the directory tree.
Then locate the PropMan directory and click the + next to it too.
Move the slider as required and tick the empty box next to the Data directory and note ticks will also appear in the boxes next to the PropMan and C directories too. They will usually be a different colour or the box will be shaded.
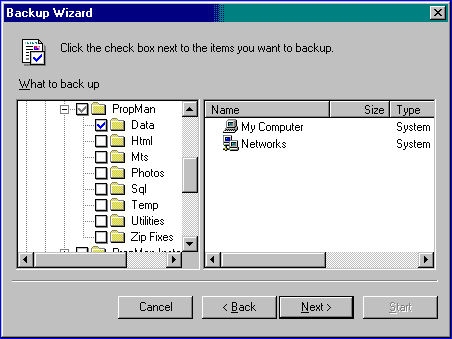
At this point we have told the back-up program to back-up all the files in the Data directory. We don't have to go and select the individual files within the directory. The "blue tick" indicates everything below this point is to be backed-up. The "shaded ticks" above indicate that only some of the items below this point are being backed-up. You can see this by expanding the My Computer icon in the right-hand pane.
Click Next and in the following window choose "All selected files" and then click Next.

When this window appears we have the opportunity to change the name of the file that our back-up file will be called

Change the file name to PropMan Daily as shown below then click Next
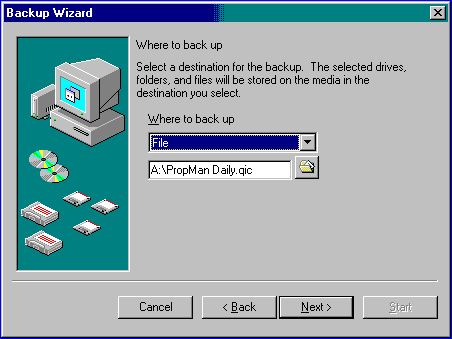
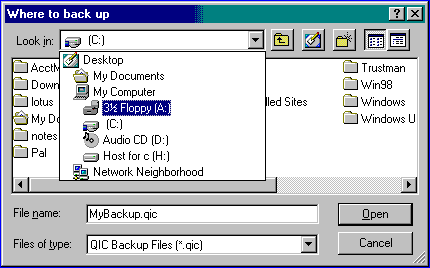
Now select the Device to which the back-up file is to be written.
Click the "Look in" drop down box and choose the A drive and click Next
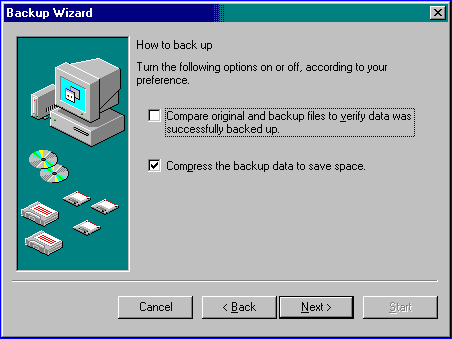
On this screen deselect "Compare original ..." and click Next.
In my view comparing what has just been written is a waste of time as the inbuilt write checking should be quite adequate. You are far more likely not to be able to read your diskette because you haven't bothered to clean the disk heads.
This window allows us to enter a decent description to call this back-up job so you will recognise it when you want to run it again. Enter PropMan Daily Back up or similar.
When you click start the back-up job will be saved and the back up will start.
So put a diskette ( e.g. Monday A) into the drive and click Start.

The back-up will proceed and informative windows and progress bars will indicate how things are going. The back-up will call for multiple diskettes when the database is bigger than 1.4Mb so insert Monday B, Monday C etc.
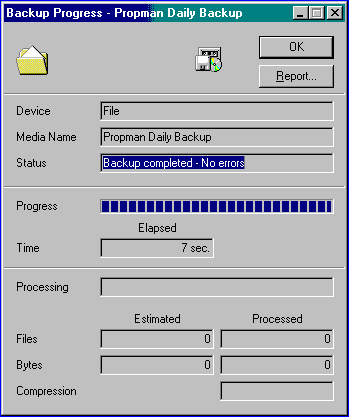
A completion window as below will appear which will show if errors have been encountered.
If you have an error message DO NOT ignore it. Fix the problem and if necessary back-up again.
Running the Back up Job Subsequently
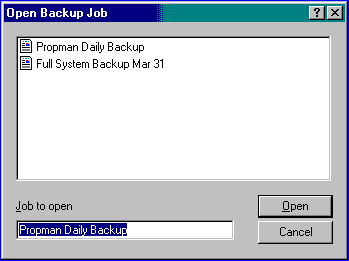
Once you have set up the job when you start the back-up process on subsequent occasions and the first screen appears choose "Open an existing back up job"
Select the PropMan Daily Back up job and click Open
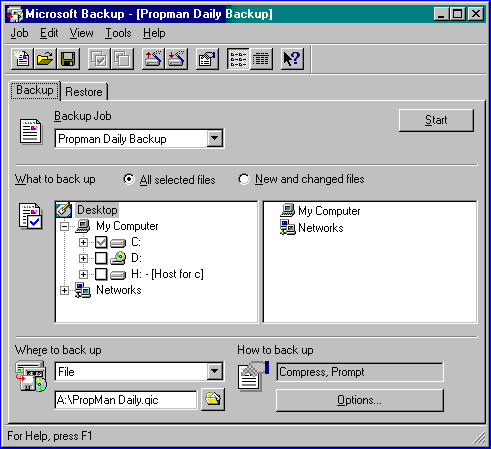
You will arrive at the Back-up/Restore main screen and all you need to do is click Start
Notes
Depending upon your back-up variant you may be told the back-up set already contains data in which case choose to overwrite or replace it. Other systems have an option on one of the menus or screens to overwrite existing data and you should set up the job to do so.
A new job can also be created from the main Back-up/Restore menu in a similar fashion.
If you have a high speed and capacity back-up device consider backing up the entire PropMan directory. Make your choice on a time vs benefit basis. You should, however, make a practice of backing up the whole PropMan directory to one of the Friday back-up sets each month.
Clean your disk drive or other back-up device regularly. In most offices once a month will be adequate. If your general environment is dirty and dusty you may need to do so more frequently.
If you get any write error messages during the back-up clean the device. You should reformat diskettes.
With tape back ups you may be able to erase and or re-initialise the tape and try it again. If you have repetitive errors on more than one tape get the tape drive checked. If it is only one tape it may need to be thrown away. When you do get tape errors put a "red dot" on the tape label. Too many red dots means throw it out.
Restore Procedure
Having backed-up your data day after day and wondering whether it is worthwhile, the time will eventually come when you need it. So you now need to "restore" or recover the data from your back up media on to your hard disk. This topic works through that process and with the same comments as made previously - there many variants of the "standard Windows" back up so what you see in the images I have reproduced below may not match your system but the general philosophy is the same. Some intermediary windows will also appear which I have not reproduced.
Before we start I want to make a few important comments.
.....1. Unless your system has crashed beyond redemption always make a copy of your data before you perform the restore. Corrupt, or otherwise, it may be the only data you will ever have. You made need expert help to recover it from a damaged database but it is better than losing "years" of information.
.....This copy may be made simply by:-
4 a) renaming the directory where the data is presently located so it will not be overwritten in the restore process.
4 b) copying the database to another part of the same hard disk.
4 d) copying the database to another machine in a networked environment.
.....DO NOT RELY upon your existing "off machine" back-ups for this copy. Taking another back-up may equally be a waste of time if your back-up device is faulty or the database has been saved containing "junk" data for the last couple of months.
.....2. Don't wait until disaster strikes before you work through the restore process. If you do, you will be struggling with the worry of losing the database and trying to learn how to restore your system at the same time. I can virtually guarantee you will stuff it up and possibly lose the lot. So sometime soon work through the restore process making sure you have a safe copy of your database. If you don't know how then pay for some expert help.
.....3. Most back-up programs create a "catalogue" file which lists the files contained in the back-up. This catalogue may be written on the back-up media itself, and/or, may be held in a file within the back-up/restore program. All back-up/restore programs provide for re-creating this catalogue from the data files contained in the back-up. When you perform a restore, at least one of these catalogues will be used to determine which files are to be copied from the media to your hard disk.
........Some catalogues are written at the start of the media and others at the end. Frequently on diskette back ups it is on the last diskette and the restore will call for the last diskette of a set to be loaded first. Don't worry too much as the routine will sort it out for you.
.....4. Every file on the hard disk has a date on which it was last accessed or modified and most restore programs avoid overwriting files on the disk which have been used more recently than those on the back-up media. You have to "force" any overwriting to happen by choosing the right options during the restore process.
........It is not a good idea to restore only some of the files which make up a database and so in the Aspect Property Manager you will normally recover the entire Data directory.
.....5. If you now relate points 1a and 4, you can see by renaming the ...\PropMan\Data directory to say ...\PropMan\Data B4 Restore Apr 01 you have achieved both requirements of making a copy of what you have and avoiding the date clash problem.
Doing the Restore
Having first made a copy of the database and started the Microsoft Back up you will see this image. Select "Restore backed up files".

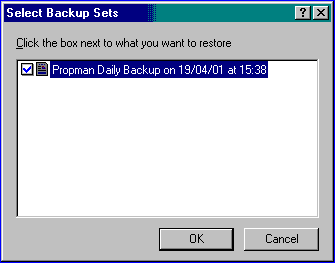
The next window may have multiple choices depending upon your environment. Choose "PropMan Daily Back up" (or whatever you called the daily job) and click [OK]
You may need to answer a question or two about using the catalogue (see 3 above) or recreating it from the media. These are variant dependent but eventually you should wind up with a window like this one, showing you the files available to restore. I am sorry to be so vague here but that is why I made point 2 above. There are just too many versions.
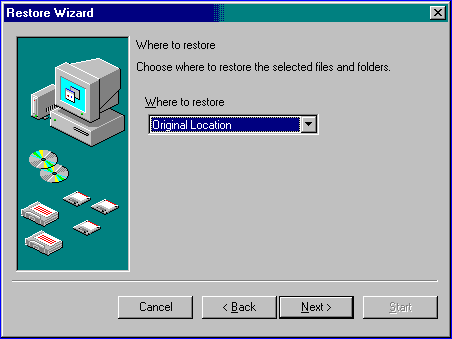
This screen asks where to place the restored database. If you renamed the Data directory you can leave the choice as it is and click Next. The back up will create a new Data directory and place the database files in it. You could also choose to restore the files to some other location
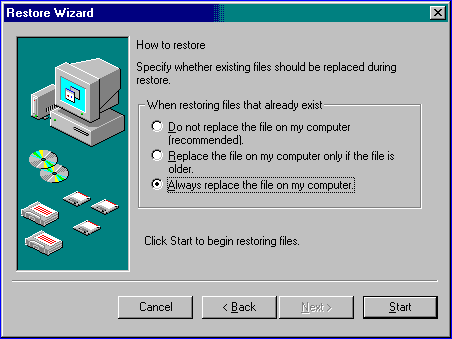
If you didn't rename Data directory on this next screen you must choose to overwrite the existing files.
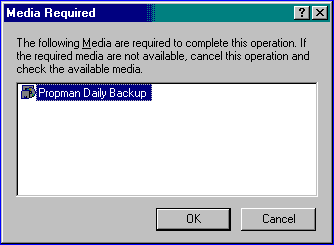
The back up program will now call for the media required. This may appear redundant at first glance, but with systems where you have selected what to restore from the internal catalogue, it is necessary. The media will be checked and you may be called to insert other diskettes.
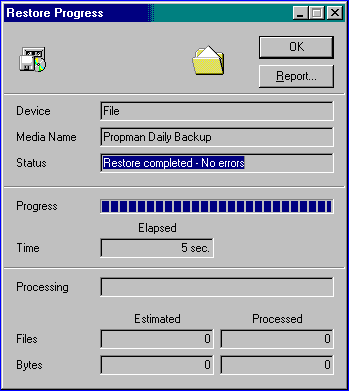
Hopefully the restore will proceed without a hitch and the next window will appear. Do not ignore any error messages. If necessary repeat the restore process. If you got media read errors messages clean the back-up device before repeating the restore.
In the event the restore process itself failed you will need to determine whether you have a hardware problem and take appropriate if so.
If the restore worked but the data is still corrupt work your way back through earlier back-ups until you get a good one.
If you never get a good one you will need to get expert help to see if the data can be recovered from the damaged database. You can now perhaps see the value of saving your last database before starting the restore. The recovery process is likely to cost the same whether the database is the most recent corrupt one or the oldest one you have. There will be less data to re-enter with the latest version too.
It's also worth remembering that it is not just when a database has been corrupted that a restore can be used. For example if you ran the payments processing and then found you had not entered some bank statements you could return to the "last" back up enter the statement details and the run the payment processing again. Or return to before End of Period to tidy up something missed "last month" then run End of Period again.
Alternative Back up Method
With the advent of Windows ME, Microsoft have weaselled out (like we have) of providing back up software and said there are just too many variations to cope with. Zip disks, DVDs and re-writable CDs have made "standardised" back ups too hard.
This topic suggests one method which can be used where you have a database which will fit many times on to high capacity random access media such as those mentioned above. Although it would also work for a sequential medium like tape it is not practical because the time taken to back-up or restore is unacceptable.
I am still going to use the "nine set" method described above and will refer to Zip disks (abbreviated to ZD) throughout this discussion as the back up medium. It is also assumed you are backing up the database only which is the content of the directory named Data. You can modify the medium and method to suit your needs.
You must know how to use Windows Explorer safely. Get some instruction from someone who knows what they are doing if you are unsure of yourself. It will save you in the long run.
You must have a minimum of two CDs purely for safety. Backing up on to only one CD puts all your eggs in the one basket and really exposes you to a complete loss of your entire database. The preferred method is to use nine sets of CDs
Referring to the "nine set" method, I intend to put the four Monday to Thursday sets on one CD and the five Friday sets on a second CD.
Label one CD "Weekday Back ups" and the second CD "Friday Back ups".
Use Windows Explorer to create four separate directories on the "Weekday Back ups" CD named "Monday", "Tuesday", "Wednesday", "Thursday". On the "Friday Back ups" CD create five separate directories named "Friday 1", "Friday 2", "Friday 3", "Friday 4", "Friday 5" in the fashion shown in the image below .

To perform your back-up copy the ...\PropMan\Data directory to the directory corresponding to the day your are backing up.
Use Windows Explorer to do this as follows :-
Make sure all users are logged out of the Aspect Property Manager.
Insert the back up ZD
Start Windows Explorer.
In the left hand pane locate the PropMan directory on the "C drive" and click the folder so it turns blue and opens.
In the right hand pane click the Data directory so it turns blue.
On the keyboard press Ctl+C.
In the left hand pane locate the CD drive and click the plus (+) sign. This should open a directory tree in the left hand pane as per the image above.
In the left hand pane locate the directory corresponding to the day you are backing up and click the folder so it turns blue and opens.
Click the right hand pane the on the keyboard press Ctl+V. A panel should appear which says Copying ...
After the first time you perform a back-up this way you will get a message saying " This folder already contains a folder named "Data". If the files .... do you want to replace the existing files?"
Click the "Yes to All" button.
When the copying is complete remove the ZD and make the appropriate entry in your log book.
Dangers
I cannot overemphasise the necessity for a log book using this method as you can lose track of what is in which directory so easily.
It is very easy to select the wrong directory in Windows Explorer so be careful or you will overwrite the wrong files.
Do not use one disk for all the sub-directories. As said before two is the minimum.
Restoring
If you need to restore your database from the ZD to the hard disk follow the procedure but in reverse. Before restoring make sure you have a back up of the current database even if it is corrupt or wrong. It may be all you ever have to work with.
Compressing your Database
You can save space on the back up medium by compressing the content of the Data directory before copying to the ZD. You may also compress directly to the ZD but that may take longer than a compress then move process
You should name the compressed file Monday, Tuesday etc and copy that compressed file to the appropriate ZD directory replacing any prior file. If you name each compression differently, e.g. Wed 13 June, you will need to old back-ups as they will not be overwritten and you will rapidly fill the ZD.